 |
Search | FAQ | US Titles | UK Titles | Memories | VaporWare | Digest | |||||||
| GuestBook | Classified | Chat | Products | Featured | Technical | Museum | ||||||||
| Downloads | Production | Fanfares | Music | Misc | Related | Contact | ||||||||
| RCA J/K Player Function Motor Drive Belt Replacement | ||||||||||||||
These instructions are for replacing the function motor drive belt on RCA's J and K series electric-loading CED players. Failure of this drive belt is the single most common reason why these players cease to operate. The function motor drive belt transfers the torque to load and unload the disc, so when it first begins to fail the player may eject caddies without unloading the disc, since the caddy wasn't drawn far enough inside to reach the latching mechanism. This drive belt also provides the torque necessary to rotate the function gear assembly to the various positions corresponding to Load, Play, Unload, and Off. So if the player, when turned on, takes a long time to enter Load mode where the access door is open and the LED display flashes L, then the belt is beginning to fail. It is not uncommon for a player that has been stored for a long time to never enter Load mode when turned on because the drive belt has completely failed and all the function motor can do is endlessly spin. All J and K series players use the same function belt, RCA Stock No. 157592, which corresponds to the more readily available PRB No. SCB3.6. Replacement belts can be requested on the Products Page.

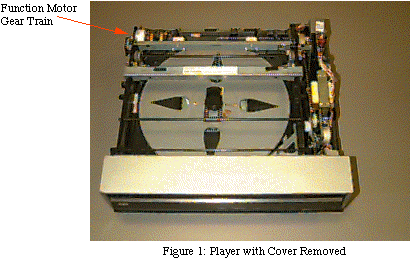
(1) Unplug the player from the wall, then remove the two Phillips screws from the back of the cabinet top and remove the top by lifting from the back. Locate the function motor gear train in the left rear of the player as shown in figure 1.

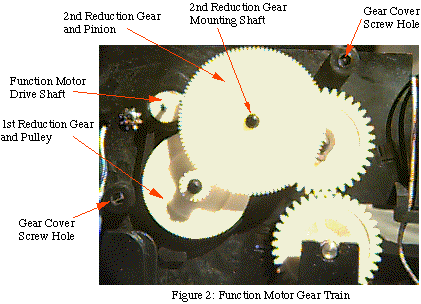
(2) The function motor gear train is partially concealed by a small black cover held in place by two Phillips screws corresponding to the screw holes indicated in figure 2. Remove these screws and the gear cover, being careful not to lose the felt washer that fits over the 2nd reduction gear mounting shaft.

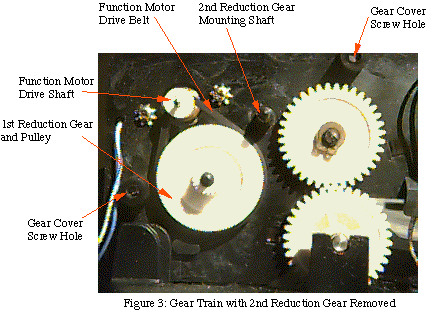
(3) Slip the combined 2nd reduction gear and pinion off the mounting shaft, which will fully expose the 1st reduction gear and pulley as shown in figure 3.
(4) If necessary, the combined 1st reduction gear and pulley can be slipped off its mounting shaft to free the old belt. Put this back on prior to installing the new belt. The old belt may have decomposed into a black tar-like substance. If this is the case, clean up the tar using a cloth rag soaked in Goo Gone solvent.
(5) Install the new belt by slipping it around the pulley, then stretching it up and over the function motor drive shaft.
(6) Place the combined 2nd reduction gear and pinion onto its mounting shaft making sure it seats all the way down, so the mounting shaft slightly protrudes.
(7) Place the felt washer over the protruding end of the 2nd reduction gear mounting shaft, then replace the gear cover, making sure the felt washer doesn't fall off before the screws are fully seated.
(8) Replace the cabinet top by holding it at a 15 degree angle while aligning the front edge before lowering the rear to the closed position. Before putting the cover back on check to make sure the player has a receiver spindle as that part is easily removed and occasionally is missing.
(9) Replace the two Phillips screws to secure the cabinet top.